ทุกวันนี้แต่ละวันมีข้อมูล (Data) ที่อยู่ในระบบคอมพิวเตอร์จำนวนมหาศาลมาก พอข้อมูลมากขึ้น พื้นที่จัดเก็บ (Storage) ก็ต้องเพิ่มตามไปด้วย และสิ่งสำคัญลำดับถัดมาก็คือ พื้นที่สำหรับสำรองข้อมูล (Backup) ก็ต้องมีมากขึ้น และวิธีการจัดเก็บก็มีเทคนิควิธีการมากมาย แล้วแต่สภาพแวดล้อม และกำลังทรัพย์ที่สามารถจัดสรรได้
ผมเคยใช้ Software สำเร็จรูปสำหรับ backup มันช่วยอำนวยความสะดวกในการสำรองข้อมูลได้มาก และราคาก็จะสูงขึ้นไปตาม features ที่ใช้งานได้ คุณลักษณะเด่นๆ ของ software แต่ละตัวก็จะแตกต่างกันออกไป เช่น รองรับการเชื่อมต่อฐานข้อมูลที่หลากหลาย, มี FTP SFTP SSH, ทำ snapshot, version control, schedule backup, เป็นต้น วันนี้จะเสนอวิธีช่วยตัวเองแบบง่ายๆ โดยไม่พึ่ง software ราคาแพงกัน
Jump to Contents
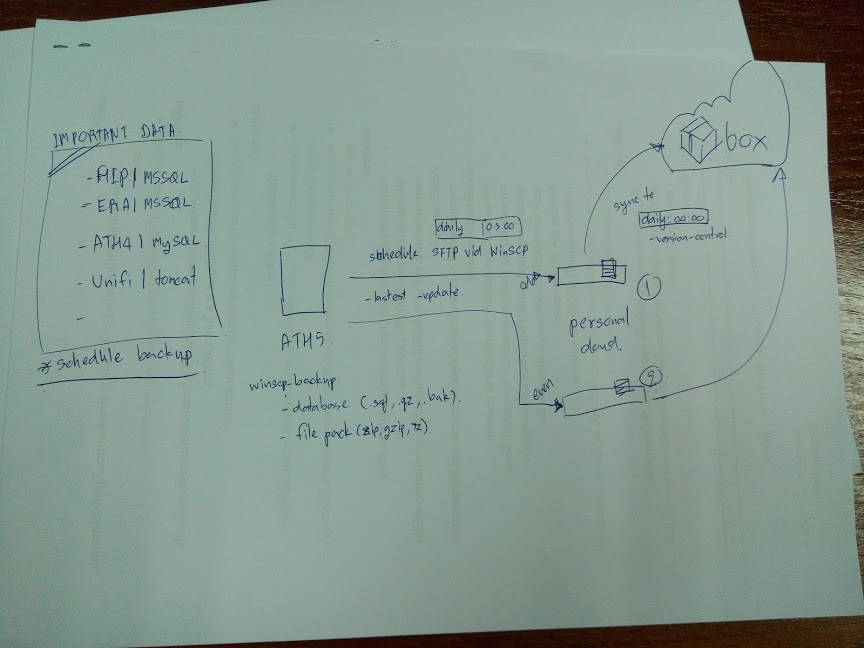
ผังการทำงานเป็นดังนี้
- เตรียมข้อมูลที่จะสำรอง
- ทำรายการของพื้นที่จัดเก็บข้อมูลใดๆ
- บีบให้เป็นก้อนเดียวและบันทึกชื่อเป็นวันที่
- ส่งไปเก็บที่ปลอดภัย
- ส่งไปเก็บบน cloud
- แจ้งเข้า Line Notify
ซึ่งไฟล์ backup.bat ก็มีการปรับไปปรับมา จนถึงจุดที่พอใจในระดับหนึ่ง โดย code จะตัดส่วนการทำงานดังนี้
คำนวนเวลาที่ใช้งาน
ใช้สำหรับแจ้งเวลาเริ่มต้นการทำงาน และเวลาสิ้นสุด พร้อมคำนวนเวลาที่ใช้ทั้งหมด ส่งไปแจ้งเตือนทาง Line ที่ตั้งค่าไว้ ในที่นี้ใช้การเรียกไฟล์ด้วยคำสั่ง CALL line.bat <argument>
:: Get start time:
SET startTime=%time: =0%

ECHO :: Line Notify = "ATH5 Start: [ %DATE% ] %startTime%"
CALL line.bat "ATH5 Start: [ %DATE% ] %startTime%"

:: Get end time:
SET endTime=%time: =0%

:: Get elapsed time:
SET "end=!endTime:%time:~8,1%=%%100)*100+1!"  &  SET "start=!startTime:%time:~8,1%=%%100)*100+1!"
SET /A "elap=((((10!end:%time:~2,1%=%%100)*60+1!%%100)-((((10!start:%time:~2,1%=%%100)*60+1!%%100)"

:: Convert elapsed time to HH:MM:SS:CC format:
SET /A "cc=elap%%100+100,elap/=100,ss=elap%%60+100,elap/=60,mm=elap%%60+100,hh=elap/60+100"

ECHO.
ECHO Start:    %startTime%
ECHO End:      %endTime%
ECHO Elapsed:  %hh:~1%%time:~2,1%%mm:~1%%time:~2,1%%ss:~1%%time:~8,1%%cc:~1%

ECHO :: Line Notify = "End: %endTime%"
CALL line.bat "End: %endTime% (%hh:~1%%time:~2,1%%mm:~1%%time:~2,1%%ss:~1%)"
Result: คำนวนเวลาที่ใช้งาน
:: Line Notify = "ATH5 Start: [ Tue 07/18/2017 ] 20:06:37.23"
{"status":200,"message":"ok"}

Start:    20:06:37.23
End:      20:06:49.38
Elapsed:  00:00:12.15

:: Line Notify = "End: 20:06:49.38"
{"status":200,"message":"ok"}
ลบไฟล์เก่า เก็บไว้เพียง 10 ไฟล์ล่าสุด
โดยตรวจสอบค่า "%varRemove%" == "true" จริงตามเงื่อนไขจะดำเนินการลบ ถ้าไม่ใช่ก็ข้ามไปทำขั้นตอนอื่นต่อ ใน IF จะใช้ FOR /F โดยกำหนด path ไปตำแหน่งที่ได้ backup ข้อมูลไว้ ในที่นี้จะใช้นามสกุลไฟล์ .zip ที่ได้หลังจากการบีบอัดแล้ว
:: Also, the files we are looking for have a 'zip' extension
IF /I "%varRemove%" == "true" (
    ECHO.
    ECHO Remove old files
    FOR /F "skip=10 eol=: delims=" %%F IN ('dir %varBackupPath%\*.zip /b /o-d') DO DEL %varBackupPath%\"%%F"
)
Backup Database ด้วย SQLCMD
โดยใช้ SQLCMD เพื่อ Backup database ซึ่งคำสั่งนี้จะเพื่อ Restore ก็ได้ เนื่องจากมันเป็น command สำหรับทำ query รูปแบบการใช้งานโดยใช้การเชื่อมต่อแบบ Windows Authentication เพื่อรัน sql
คู่มือการใช้งาน sqlcmd Utility
https://docs.microsoft.com/en-us/sql/tools/sqlcmd-utility
ตัวอย่าง:
sqlcmd -S <ComputerName>\<InstanceName> -i <MyScript.sql> -o <MyOutput.rpt>

sqlcmd -q "SELECT * FROM AdventureWorks2012.Person.Person"

sqlcmd -Q "SELECT * FROM AdventureWorks2012.Person.Person" -o MyOutput.txt
Syntax sqlcmd
sqlcmd
   -a packet_size
   -A (dedicated administrator connection)
   -b (terminate batch job if there is an error)
   -c batch_terminator
   -C (trust the server certificate)
   -d db_name
   -e (echo input)
   -E (use trusted connection)
   -f codepage | i:codepage[,o:codepage] | o:codepage[,i:codepage]
   -g (enable column encryption)
   -G (use Azure Active Directory for authentication)
   -h rows_per_header
   -H workstation_name
   -i input_file
   -I (enable quoted identifiers)
   -j (Print raw error messages)
   -k[1 | 2] (remove or replace control characters)
   -K application_intent
   -l login_timeout
   -L[c] (list servers, optional clean output)
   -m error_level
   -M multisubnet_failover
   -N (encrypt connection)
   -o output_file
   -p[1] (print statistics, optional colon format)
   -P password
   -q "cmdline query"
   -Q "cmdline query" (and exit)
   -r[0 | 1] (msgs to stderr)
   -R (use client regional settings)
   -s col_separator
   -S [protocol:]server[instance_name][,port]
   -t query_timeout
   -u (unicode output file)
   -U login_id
   -v var = "value"
   -V error_severity_level
   -w column_width
   -W (remove trailing spaces)
   -x (disable variable substitution)
   -X[1] (disable commands, startup script, environment variables, optional exit)
   -y variable_length_type_display_width
   -Y fixed_length_type_display_width
   -z new_password
   -Z new_password (and exit)
   -? (usage)
ตัวอย่างที่ผมใช้ run เพื่อ backup Database ของ ESET Remote Administrator 6 และ ฐานข้อมูลของเครื่องสแกนลายนิ้วมือ HIP (แชร์ประสบการณ์ ติดตั้งเครื่องสแกนนิ้วมือ HIP)
SQLCMD -S .\ERASQL -E -Q "BACKUP DATABASE ERA_DB TO DISK = '%cd%\data\EARDB.bak' WITH INIT , NOUNLOAD , NAME = N'%DATABASENAME% backup', NOSKIP , STATS = 10, NOFORMAT"

SQLCMD -Q "BACKUP DATABASE Pm2014_SU TO DISK = '%cd%\data\Pm2014_SU.bak' WITH INIT , NOUNLOAD , NAME = N'%DATABASENAME% backup', NOSKIP , STATS = 10, NOFORMAT"
-S .\ERASQL เนื่องจาก ERA แยกเก็บคนละ instance กับ default instance ของ SQL Server
-Q สั่ง query เพื่อไปเก็บที่ '%cd%\data\EARDB.bak'
ดูต่อที่ BACKUP (Transact-SQL)
https://docs.microsoft.com/en-us/sql/t-sql/statements/backup-transact-sql
บีบอัดไฟล์ ด้วย 7Zip
ขั้นตอนนี้จะดึงไฟล์ข้อมูลที่ได้ backup มาไว้ใน directory /data ที่กำหนดไว้ โดยบันทึกชื่อไฟล์รายวัน ตาม format นี้ YYYY-MM-DD-HHMM-backup.zip และเอาไปเก็บไว้ใน directory /send สำหรับส่ง
SET year=%date:~-4,4%
SET month=%date:~-10,2%
SET day=%date:~-7,2%
SET hour=%time:~-11,2%
SET hour=%hour: =0%
SET min=%time:~-8,2%

SET varTimeStamp=%year%-%month%-%day%-%hour%%min%
SET varTargetBackupSet=%varBackupPath%\%varTimeStamp%-backup.zip

ECHO.
ECHO TRACE: Executing backup
"%varPathToSevenZip%\7z" a -t%varArchiveType% "%varTargetBackupSet%" @"%varInclusionsFile%" -xr@"%varExclusionsFile%"
"%varPathToSevenZip%\7z" path directory ที่อยู่ของโปรแกรม 7 zip ในที่นี้คือ C:\Program Files\7-Zip
a -t%varArchiveType% สร้าง archive ด้วยประเภท -t{type of archive} ในที่นี้คือ zip
"%varTargetBackupSet%"จะให้เก็บไฟล์ที่บีบอัดแล้วไว้ที่ไหน ในที่นี้คือ /send
@"%varInclusionsFile%" ผมใช้ List file เก็บไว้ในไฟล์ Inclusions.txt
-xr@"%varExclusionsFile%" ชนิดไฟล์ หรือ directory ที่ไม่ต้องจัดเก็บ เป็น List file Exclusions.txt
7-Zip Command Line Syntax : ชุดคำสั่งหลักของ 7zip
| Command | Description |
|---|---|
| a | Add |
| b | Benchmark |
| d | Delete |
| e | Extract |
| h | Hash |
| i | Show information about supported formats |
| l | List |
| rn | Rename |
| t | Test |
| u | Update |
| x | eXtract with full paths |
7 Zip Command Line Switches Syntax : ชุดคำสั่งเสริมของ 7zip
คู่มือการใช้ 7-Zip Command Line
https://sevenzip.osdn.jp/chm/cmdline/ตัวอย่างการใช้ 7-Zip Command Line
https://www.dotnetperls.com/7-zip-examples
ส่งไฟล์ผ่าน SFTP ด้วย WinSCP.com
คำสั่งนี้จะไปเรียก winscp.com และส่ง argument เข้าไปเพื่อทำงาน โดยใช้ /script=script.txt ที่มีคำสั่งสำหรับอัพโหลดไฟล์และค่าต่างๆ
ลิงค์สำหรับสร้าง Script Code
https://winscp.net/eng/docs/ui_generateurl
:: SFTP transfer
IF EXIST %varPathWinSCP% (
    ECHO.
    ECHO :: SFTP transfer
    WinSCP\Winscp.com /script=script.txt
) ELSE (
    ECHO ERROR: Not found Winscp.com
){User}แทนค่า ชื่อผู้ใช้{Password} แทนค่า รหัสผ่าน{host or IP} แทนค่า ชื่อโฮส หรือ ไอพี{Key Fingerprint} แทนค่า โฮสคีย์ SSH-RSA
option echo off
option batch on
option confirm off
open sftp://{User}:{Password}@{host or IP} -hostkey="ssh-rsa 2048  {Key Fingerprint}"
put -nopermissions -nopreservetime -latest "%varTargetBackupSet%" "%varSFTP%"
exit
WinSCP Command Line Syntax
| Command | Description |
|---|---|
| call | Executes arbitrary remote shell command |
| cd | Changes remote working directory |
| checksum | Calculates checksum of remote file |
| chmod | Changes permissions of remote file |
| close | Closes session |
| echo | Prints message onto script output |
| exit | Closes all sessions and terminates the program |
| get | Downloads file from remote directory to local directory |
| help | Displays help |
| keepuptodate | Continuously reflects changes in local directory on remote one |
| lcd | Changes local working directory |
| lls | Lists the contents of local directory |
| ln | Creates remote symbolic link |
| lpwd | Prints local working directory |
| ls | Lists the contents of remote directory |
| mkdir | Creates remote directory |
| mv | Moves or renames remote file |
| open | Connects to server |
| option | Sets or shows value of script options |
| put | Uploads file from local directory to remote directory |
| pwd | Prints remote working directory |
| rm | Removes remote file |
| rmdir | Removes remote directory |
| session | Lists connected sessions or selects active session |
| stat | Retrieves attributes of remote file |
| synchronize | Synchronizes remote directory with local one |
ส่งการแจ้งเตือนผ่านทาง Line Notify
ใช้ Line Notify API เพื่อส่งข้อความแจ้งเตือน เวลาเริ่มต้น, สถานะ task ที่ทำงาน, เวลาสิ้นสุด, รวมเวลาที่ใช้ สามารถอ่านรายละเอียดของ Line API ได้ที่ https://notify-bot.line.me/doc/en/
ซึ่งใน Windows จำเป็นต้องโหลด curl มาเพื่อใช้ในการส่งข้อมูล ดาวน์โหลดได้ที่ https://curl.haxx.se/download.html สำหรับ Windows นั้นไม่ต้องติดตั้ง แตก zip แล้วนำ curl.exe มาใช้งานได้ทันที โดยเลือกให้เหมาะสมกับ OS ที่ใช้งานอยู่ทั้งแบบ 32bit และ 64bit


ตัวอย่างการส่งด้วย curl
$ curl -X POST -H 'Authorization: Bearer <access_token>' -F 'message=foobar' https://notify-api.line.me/api/notify
ตัวอย่าง:
SET "msg=%~1"

curl -X POST -H "Authorization: Bearer %varToken%" -F "message=%msg%" https://notify-api.line.me/api/notify
ผลลัพท์ที่ได้

การตั้งค่า Settings.txt
ค่าต่างๆจะถูกกำหนดไว้ในไฟล์ Settings.txt และถูกเรียกใช้โดย backup.bat โดยใช้คำสั่งดังนี้
:: Configulation file
SET dest=Settings.txt

IF EXIST %dest% GOTO labelBegin

ECHO.
ECHO ERROR: Settings file not found!
GOTO :EOF

:labelBegin
ECHO.
ECHO TRACE: Reading settings
FOR /F "eol=# tokens=1,2 delims==" %%i IN (%dest%) DO (
    SET %%i=%%j
    ECHO TRACE: %%i = '%%j'
)
SET dest=Settings.txt รับค่าจากไฟล์เข้ามา จากนั้น IF EXIST ถ้าพบว่ามีไฟล์นี้จริงอยู่ใน directory เดียวกัน ก็ข้ามไป :labelBegin เพื่อเริ่มการทำงาน ถ้าไม่พบก็จะแจ้งเตือนว่าไม่พบไฟล์ จากนั้นจะ for loop %dest% เพื่อกำหนดตัวแปรขึ้นมา ด้วย SET %%i=%%j ซึ่งไฟล์ Settings.txt มีรายละเอียดดังนี้
# Task Runner for(task1 task2 ... taskN)
varTask=backup-sqlcmd backup-zip

# The path to the where the 7z.exe executable is
varPathToSevenZip=C:\Program Files\7-Zip

# The path to the where the WinSCP executable is
varPathWinSCP=D:\Dev-Batch\schedule-backup\WinSCP\Winscp.com

# The path where to store the backup sets
varBackupPath=D:\Dev-Batch\schedule-backup\send

# The file path to the inclusions file
varInclusionsFile=D:\Dev-Batch\schedule-backup\Inclusions.txt

# The file path to the exclusions file
varExclusionsFile=D:\Dev-Batch\schedule-backup\Exclusions.txt

# Whether to wait at the end of the backup
varWaitAtEnd=0

# Type of backup archive to create
varArchiveType=zip

# SFTP PATH
varSFTP=/moremeng/box_backup/

# keep the most recent 10 files
varRemove=true

# Line token
varToken=xxxxxxxxxxxxxxxxxxxxxxxxxxxxxxxxxxxxxxxxxxxx
หลังจากได้ batch file เพื่อทำงานแล้ว ก็เข้าไปตั้งค่าใน schedule task เพื่อให้ทำงานตามวันและเวลาที่กำหนด
วิธีสร้าง Task Schedule สำหรับ .bat
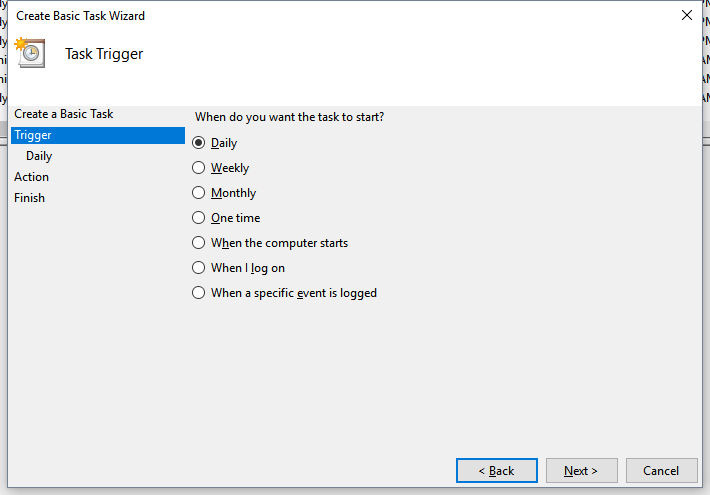
เข้าไปที่ Start > ค้นหา task schedule > เปิดขึ้นมา จากนั้นคลิกขวาที่ Task Scheduler Library เลือก Create Basic Task กรอก ชื่อ task และ คำอธิบาย (ุถ้ามี)

จากนั้นเลือกความสม่ำเสมอของการทำงาน เช่น ทุกวัน, ทุกอาทิตย์, เฉพาะตอนเปิดเครื่อง, หรือเหตุการณ์อื่นๆ
ระบุช่วงเวลา ซึ่งจะขึ้นอยู่กับ Trigger ที่เราเลือก ถ้าไม่ได้ระบุให้ “ทำซ้ำ” หน้าต่างด้านล่างก็จะปรากฏขึ้น

จากนั้นเลือก Action ในที่นี้จะให้ Start a program

จากนั้นจะขึ้น Program/script ที่ต้องการให้ทำงาน ให้ Browser ไปยังไฟล์ .bat ที่สร้างไว้ หากมีการกำหนด argument ก็สามารถระบุเข้าไปได้ และที่สำคัญ คือส่วนของ Start in (ontional) ตรงนี้หากเราไมได้ run .exe หรือ คำสั่ง batch ไม่ได้ทำงานทั่วๆ ไป จำเป็นต้องระบุ path ให้มันด้วย ไม่งั้นโปรแกรมจะเริ่ม run จาก C:\ ไม่ใช่ตำแหน่งที่เราจัดเตรียมไว้

เสร็จแล้วจากนั้นก็ Finish

เป็นอันจบกระบวนการทั้งหมดที่สร้างขึ้น ซึ่ง script ก็สามารถปรับปรุงเปลี่ยนแปลงไปได้เรื่อยๆ ให้เหมาะสมกับการใช้งาน ซึ่งท้ายที่สุดแล้วจะนำไฟล์ที่โยนเข้า NAS ที่ได้ share folder ไว้สำหรับสำรองข้อมูล และ Sync ไปเก็บไว้บน Cloud